
1. Intro
Ini adalah artikel tentang operasi dasar pada Python
2. Persiapan
Bahan :
- Arduino Uno
- LCD 16x2
- Stepper motor NB6600
- Keypad 4x4
- Relay
- PWM Pulse Generator
- Usongshine Nema 17 17HS4401 Motor Stepper 42-40MM 12V 1.5A plus Kabel (Motor)
- Infrared Obstacle Avoidance Sensor IR Proximity
Fitur :
- Putaran berdasarkan input keypad, jika mencapai target keypad relay akan berhenti
- Live Count putaran muncul pada LCD menggunakan sensor
- Press # to reset counting
Gambaran :
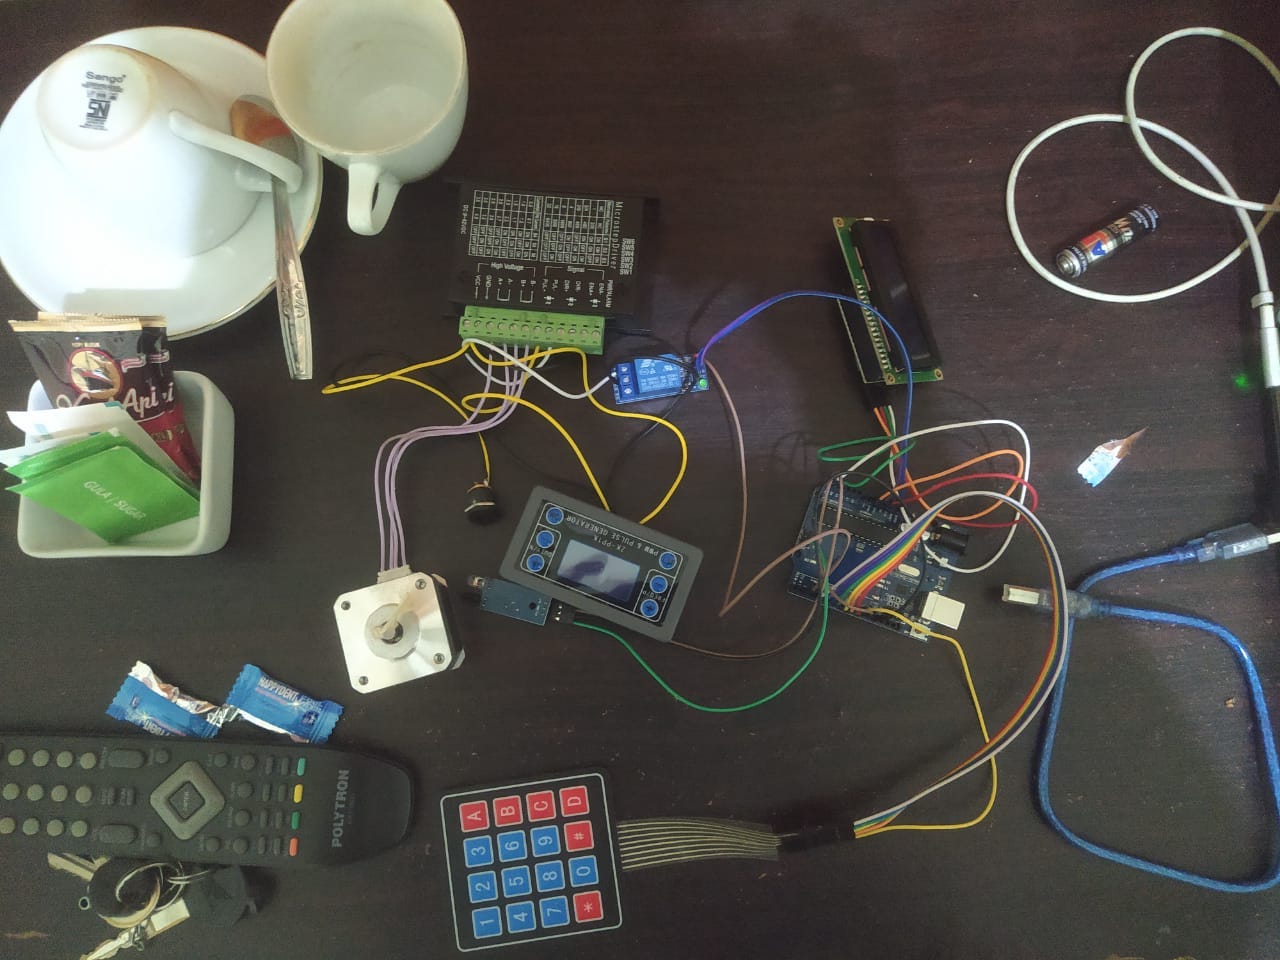 </img>
3. Code Program
#include <Keypad.h>
#include <Wire.h>
#include <LiquidCrystal_I2C.h>

// Pin Relay
const int relay = 2;
const int Aktif = LOW;
const int TidakAktif = HIGH;

// Keypad Setting 4x4
const byte ROWS = 4;
const byte COLS = 4;
char hexaKeys[ROWS][COLS] = {
  {'1', '2', '3', 'A'},
  {'4', '5', '6', 'B'},
  {'7', '8', '9', 'C'},
  {'*', '0', '#', 'D'}
};
byte rowPins[ROWS] = {11, 10, 9, 8};
byte colPins[COLS] = {7, 6, 5, 4};
Keypad customKeypad = Keypad(makeKeymap(hexaKeys), rowPins, colPins, ROWS, COLS);

// Setting LCD
LiquidCrystal_I2C lcd(0x3F, 16, 2);

String speedInput = "";
int motorSpeed = 0;
volatile int rotationCount = 0;
volatile bool updateLCD = false;

void setup() {
  Serial.begin(9600);
  pinMode(relay, OUTPUT);
  digitalWrite(relay, TidakAktif);

  lcd.begin();
  lcd.backlight();
  lcd.setCursor(0, 0);
  lcd.print("S.PUTARAN: ");
  lcd.setCursor(0, 1);
  lcd.print("P.TERBACA: ");

  // Fungsi Count
  attachInterrupt(digitalPinToInterrupt(12), countRotation, RISING);
}

void loop() {
  char customKey = customKeypad.getKey();

  if (customKey) {
    Serial.println(customKey);

    if (customKey >= '0' && customKey <= '9') {

      speedInput += customKey;
      lcd.setCursor(12, 0);
      lcd.print(speedInput);
    } else if (customKey == '*') {

      if (speedInput.length() > 0) {
        motorSpeed = speedInput.toInt();
        if (motorSpeed > 0) {
          lcd.setCursor(12, 0);
          lcd.print("    ");
          lcd.setCursor(12, 0);
          lcd.print(motorSpeed);
          digitalWrite(relay, Aktif);
          Serial.println("Relay is ON");


          simulateMotorRotations();
        } else {
          lcd.setCursor(12, 0);
          lcd.print("Err");
        }
      }
    } else if (customKey == '#') {

      speedInput = "";
      lcd.setCursor(12, 0);
      lcd.print("    ");
      lcd.setCursor(12, 1);
      lcd.print("    ");
      digitalWrite(relay, TidakAktif);
      Serial.println("Relay is OFF");


      rotationCount = 0;
      lcd.setCursor(12, 1);
      lcd.print("0   ");
    }
  }

  // Update Live Count
  if (updateLCD) {
    lcd.setCursor(12, 1);
    lcd.print(rotationCount);
    updateLCD = false;
  }
}

// Fungsi Stop
void countRotation() {
  rotationCount++;
  updateLCD = true;  // Set flag to update the LCD in the main loop
}

// Proses Putaran Motor
void simulateMotorRotations() {
  for (int i = 0; i < motorSpeed; i++) {
    delay(500);  // Simulate time for one rotation
    countRotation();  // Increment the rotation count
    lcd.setCursor(12, 1);  // Update the LCD
    lcd.print(rotationCount);
  }
  digitalWrite(relay, TidakAktif);  // Turn relay OFF after simulation
  Serial.println("Relay is OFF after simulation");
}
Hasil
Silahkan Lihat Pada Video Demo Dibawah :